Dynamic generation of multiple CI/CD parent-child pipelines using GitLab

Introduction
As projects become larger and more complex, we face numerous challenges in dealing with the CI/CD setup. Configuration files become large, readability drops, and effort that it takes to add additional steps in pipelines increases.
When it comes to dealing with complicated CI/CD setups, one concept definitely stands out: parent-child pipeline. It offers a way to branch out different sections of the setup and create multiple pipelines that can be independent and separately managed.
Parent-child pipelines allow us to create efficient pipelines, split configuration files into smaller parts that are easier to understand, and dynamically generate pipelines based on our project.
The first section of this article describes how to set up GitLab locally. Doing so gives you a playground where you can experiment without wasting compute time in the cloud. If you’d like to jump straight to a dynamic setup, go to the Dynamic Parent-Child Pipelines section.
Local Setup
There are multiple ways to set up GitLab locally, but as always, when it comes to local testing it’s easier to use Docker images. We will need two of them:
- GitLab Community Edition docker image: gitlab/gitlab-ce
- GitLab CI Multi Runner docker image: gitlab/gitlab-runner
The first one will give us the standard GitLab web application that we will run in the localhost, the second is a runner that we need to register in order to run our local pipelines.
GitLab Community Edition
First, let’s start the GitLab application:
docker run \
    -p 4000:80 \
    --name gitlab \
    gitlab/gitlab-ce
This will take a few minutes, you’ll see a lot of output that logs all the
services that are required for the application. Once it’s done, you can go to
localhost:4000 and you’ll see:
To login, we have to get GitLab’s initial root password located in
/etc/gitlab/initial_root_password. The following command will do that:
docker exec -it gitlab grep 'Password:' /etc/gitlab/initial_root_password
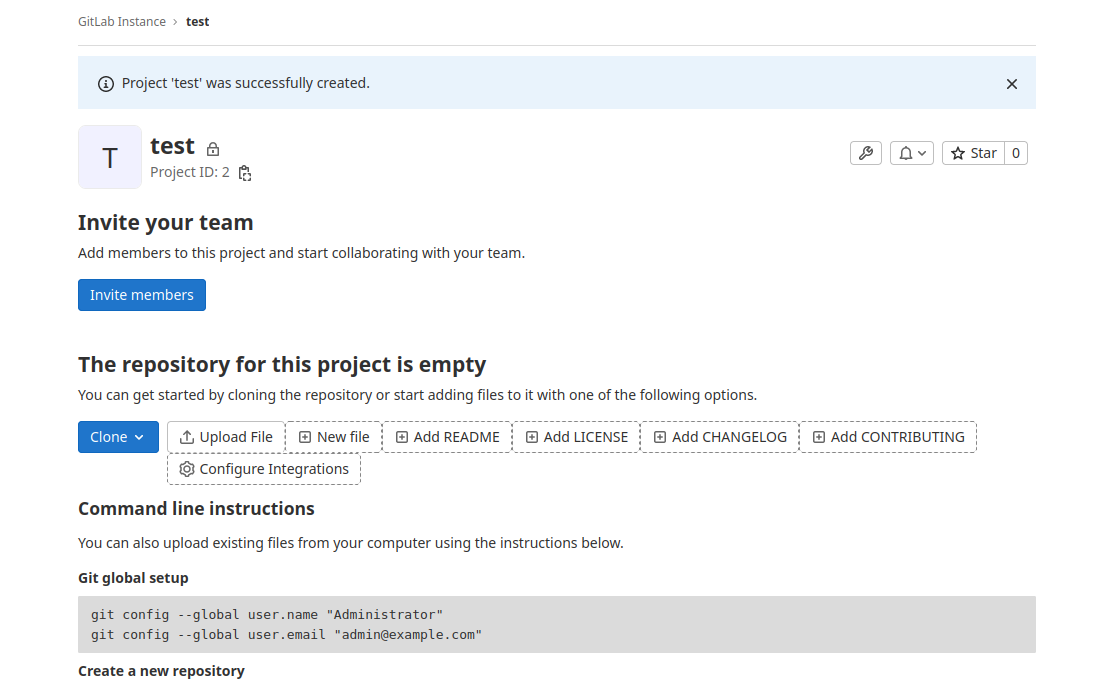
Now log in using username root and the password. Next, create a new blank
project - no need to change anything, just provide a name (test in this
example) and you’ll see:
To quickly test a pipeline, create the .gitlab-ci.yml configuration file
with the following content:
build-job:
  stage: build
  script:
    - echo "Hello, $GITLAB_USER_LOGIN!"
This will start the job but it will get stuck:
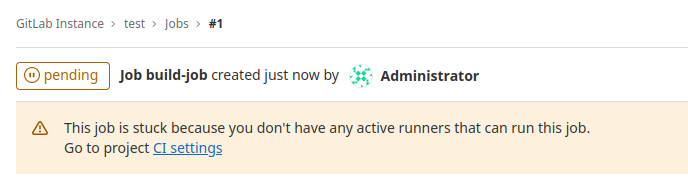
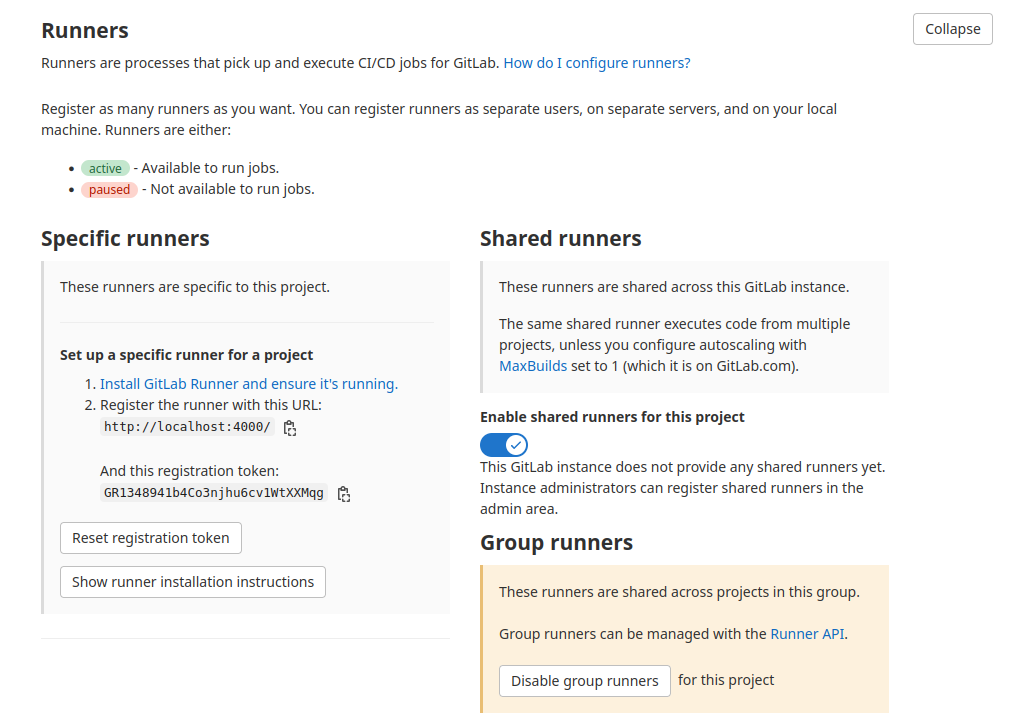
To resolve this, we need to start a GitLab runner and register it using the registration URL and token. This information can be found in the Settings > CI/CD section:
GitLab Local Runner
Registration process requires communication between containers i.e the
GitLab application and a runner. When the docker starts, it will create a
default network called bridge. From that point onward, when we start a
container it will be automatically added to the bridge network, unless
otherwise specified.
In this network, each container has a unique IP address and one container
can talk to the other over it. We can check that the bridge network is
running using docker network ls:
$ docker network ls
NETWORK ID     NAME      DRIVER    SCOPE
4eac0fb260aa   bridge    bridge    local
ae5007f2c299   host      host      local
283668e039d1   none      null      local
To get the IP address of the gitlab container in this network we use the
following command:
$ docker inspect gitlab | grep IPAddress
"IPAddress": "172.17.0.2"
The other important thing is how we direct a runner to connect to the
application. We access the application on localhost:4000, but for the runner
it’s different since it goes through the bridge network, so we will use the
bridge network IP address and port 80.
The following will run the GitLab runner image:
docker run -d --name gitlab-runner --restart always \
    -v /srv/gitlab-runner/config:/etc/gitlab-runner \
    -v /var/run/docker.sock:/var/run/docker.sock \
    gitlab/gitlab-runner:latest
The first configuration for the volume is important since we want to make sure that the configuration is not lost when the container is restarted and we can configure it while it’s running.
The registration is done by running a short-lived gitlab-runner container
that will generate a configuration file, after the registration process, and
store it in the volume that will be loaded by the runner.
For more information about the registration process, please see: Registering runners
To start the registration container, use the following:
docker run --rm -it \
    -v /srv/gitlab-runner/config:/etc/gitlab-runner \
    gitlab/gitlab-runner register
It will ask you to:
- Enter the GitLab instance URL, which is
http://<bridge-gitlab-ip>:80/e.g.http://172.17.0.2:80/ - Provide registration token - go to Settings > CI/CD
- Enter the executor - we will use
dockerwith default imagepython:3.8
If everything goes well, you should see:
Runner registered successfully. Feel free to start it, but if it's running
already the config should be automatically reloaded!
Since we already have a running runner, the GitLab application should pick it up automatically, which can be seen in the UI:

However, our pipeline fails:
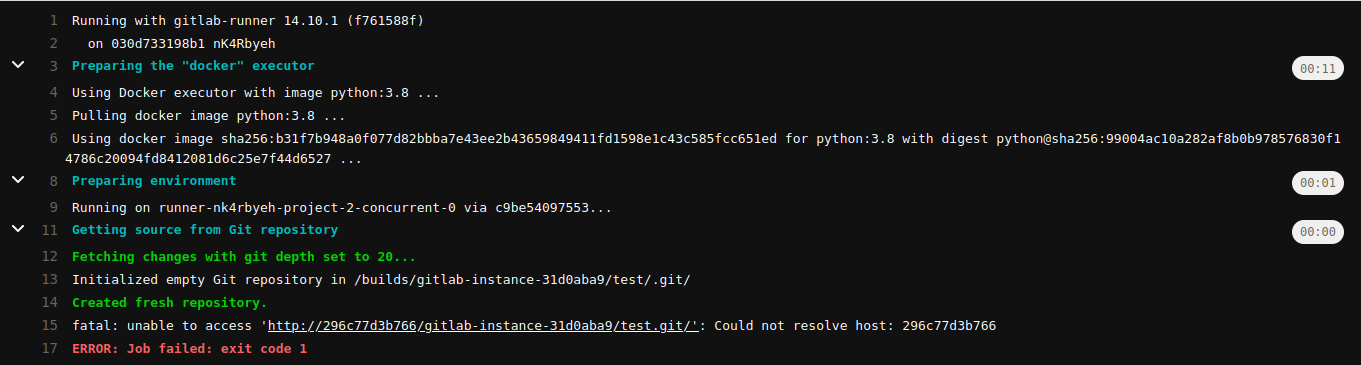
As we can see, the error message is pretty clear, the runner failed to create an API call because it cannot resolve a hostname. To fix this we could define a hostname for our docker container, or simply configure the runner so it knows how to resolve the value - which is nothing more than the ID of the container which runs the GitLab application.
From above we know that the configuration is stored in
/etc/gitlab-runner/ in the gitlab-runner container. Edit the config.toml
file by adding the extra_hosts:
[[runners]]
  name = "030d733198b1"
  url = "http://172.17.0.2:80/"
  token = "nK4RbyehkhayxpfNPj19"
  executor = "docker"
  [runners.custom_build_dir]
  [runners.cache]
    [runners.cache.s3]
    [runners.cache.gcs]
    [runners.cache.azure]
  [runners.docker]
    tls_verify = false
    image = "python:3.8"
    privileged = false
    disable_entrypoint_overwrite = false
    oom_kill_disable = false
    disable_cache = false
    volumes = ["/cache"]
    shm_size = 0
    extra_hosts = ["296c77d3b766:172.17.0.2"]  <---- add this
Note: values
296c77d3b766and172.17.0.2are different in your case
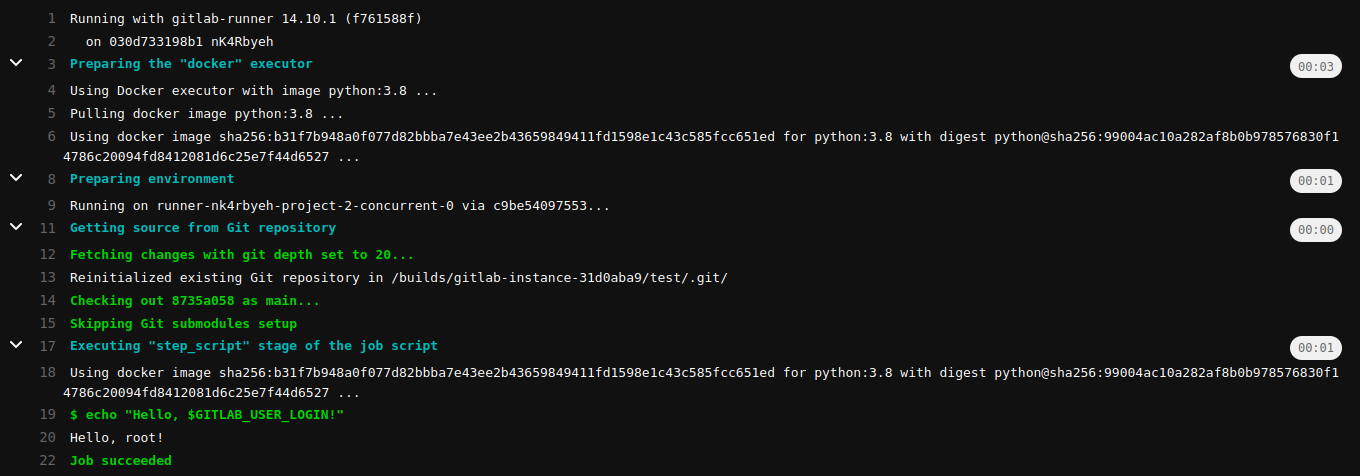
If you retry the failed build-job, it should succeed:
Now that our runner works, we can proceed with building parent-child pipelines.
Parent-Child Pipelines
In general, a single global pipeline can lead to all kinds of inefficiencies
that can introduce arbitrary wait times and clutter the CI/CD setup. Not to
mention that as the complexity of our CI/CD pipelines grows we encounter
issues with large .yml configuration files and includes that increase the
complexity and trackability of the setup. To tackle these challenges we can
configure parent-child pipelines which allow us to:
- Initiate different pipeline stages that can work independently
- Split configuration and make the whole setup more manageable
- Define multiple pipelines that have different behaviors
Static
The simplest way of creating a parent-child pipeline is to use
trigger which allows
us to start a downstream pipeline that can be either a multi-project pipeline
or a child pipeline. In order to trigger a child pipeline we have to specify
the configuration of the child pipeline using
include.
Auto
To do this we will define .gitlab-ci.yml and service_a.yml to be:
# .gitlab-ci.yml
stages:
  - build
  - services

build-job:
  stage: build
  script:
    - echo "Hello, $GITLAB_USER_LOGIN!"

service_a:
  stage: services
  needs:
    - build-job
  trigger:
    include: service_a.yml
# service_a.yml
child-job:
  script:
    - echo "This is service "A" - child job!"
We have two stages build and services, the job service_a requires the
build-job and then triggers a child pipeline which configuration contains
the child-job.
In the UI that looks like:

Manual
Let’s say that we want to include service_b child pipeline but this time we
want to manually trigger the child pipeline. To do this we will need a new
configuration file service_b.yml and a new job service_b that uses
when keyword:
# .gitlab-ci.yml

# ... same as above
service_b:
  stage: services
  needs:
    - build-job
  trigger:
    include: service_b.yml
  when: manual
# service_b.yml
child-job:
  script:
    - echo "This is service "B" - child job!"
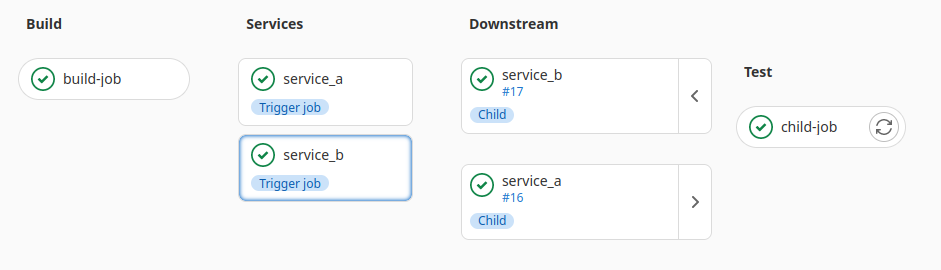
The result is:
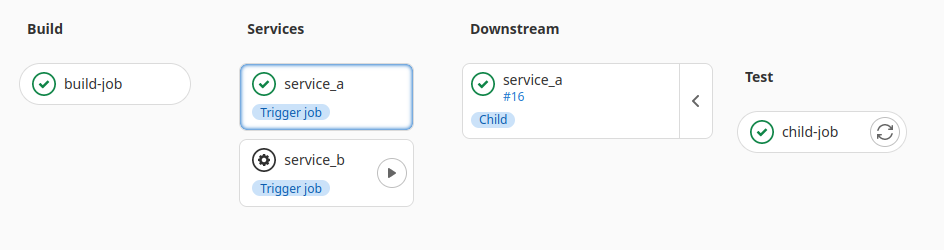
And when triggered:
Multiple
Obviously our child pipeline can be the parent of a new child pipeline, so
let’s add a new job service_c that will trigger a new child pipeline with one
job and a trigger that depends on the job.
Edit the .gitlab-ci.yml file:
# .gitlab-ci.yml

# ... same as above

service_c:
  stage: services
  needs:
    - build-job
  trigger:
    include: service_c.yml
Define the new configuration file for service_c child pipeline:
# service_c.yml

stages:
 - build-c
 - deploy-c

build-service-c:
  stage: build-c
  script:
    - echo "Building service C!"

deploy-service-c:
  stage: deploy-c
  needs:
    - build-service-c
  trigger:
    include: deploy_service_c.yml
Finally, define the another child pipeline that we will call
deploy_service_c:
stages:
  - deploy

deploy-service-c:
  stage: deploy
  script:
    - echo "Deploying service C!"
The pipeline now looks like:

Dynamic
Defining configuration files manually is tiresome and error prone. A better way is to configure our pipelines in such a way that the configuration files are generated on the fly.
Simple
The way we are going to approach this is to define three things:
- Script that generates the configuration
- Job that will generate the child pipeline configuration and store it as a
job artifact- which is just a file or directory that other jobs in the pipeline can reference. - Trigger job (just like in the previous section) but
this time, it will use the artifact and not static
.ymlfiles.
The simplest way of generating a child configuration is to pass an argument
to the script, for example A,B,C and based on that it will generate multiple
jobs: test-A-job, test-B-job, and test-C-job.
The following code defines the script child_generator.py which generates
the configuration and stores it in child_pipeline.yml file (that will be used
as an artifact).
# child_generator.py
import sys


def generate_job(name):
    return f"""
test-{name}-job:
  script:
    - echo "Testing {name}"
"""


def main(names):
    with open("child_pipeline.yml", "w") as f_out:
        for name in names:
            f_out.write(generate_job(name))


if __name__ == "__main__":
    names = sys.argv[1].split(",")
    main(names)
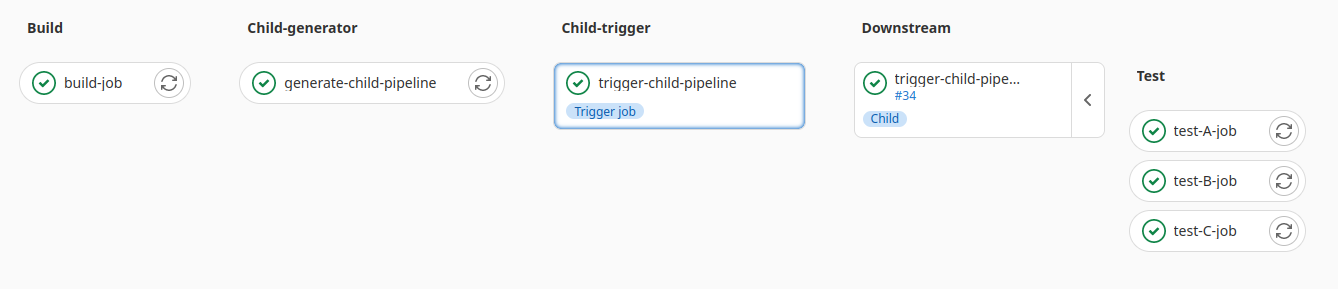
Next, we define the .gitlab-ci.yml. We need two jobs:
generate-child-pipeline- to generate the child pipeline configuration based on an argument and output it as an artifacttrigger-child-pipeline- to include the artifact and trigger the child pipeline
stages:
 - build
 - child-generator
 - child-trigger

build-job:
  stage: build
  script:
    - echo "Hello, $GITLAB_USER_LOGIN!"

generate-child-pipeline:
 stage: child-generator
 needs:
   - build-job
 script:
   - python3 child_generator.py A,B,C
 artifacts:
   paths:
     - child_pipeline.yml

trigger-child-pipeline:
 stage: child-trigger
 trigger:
   include:
     - artifact: child_pipeline.yml
       job: generate-child-pipeline
The result:
The important thing is that the argument A,B,C can really be
anything.
# example
script:
  - ARG=`<fetch-arguments>`
  - python3 child_generator.py "$ARG"
The job script can fetch or generate arguments that are passed to the child pipeline generator script, which makes it truly dynamic.
Nested
Let’s say that we want to build a pipeline that fetches the names of services and for each service builds a dedicated pipeline that will build, test, and deploy it. This extends the example from the previous section by adding an additional configuration generator for building, testing, and deploying.
The starting point is the same, we define two jobs and the
services_generator.py script that will generate child pipelines for
generating dedicated pipelines for each service:
# .gitlab-ci.yml
stages:
 - build
 - generate-services
 - trigger-services

build-job:
  stage: buildchild pipelines for each
service:
  script:
    - echo "Hello, $GITLAB_USER_LOGIN!"

generate-service-pipelines:
 stage: generate-services
 needs:
   - build-job
 script:
   - python3 services_generator.py A,B,C
 artifacts:
   paths:
     - services.yml

trigger-service-pipelines:
 stage: trigger-services
 trigger:
   include:
     - artifact: services.yml
       job: generate-service-pipelines
However, services_generator.py now creates a pipeline configuration that
calls service_generator.py which will generate a child pipeline dedicated
for that specific service.
# services_generator.py
import sys

def generate_header():
    return f"""
stages:
  - generate-service
  - trigger-service
"""

def generate_service_pipeline(name):
    return f"""
generate-{name}-service:
  stage: generate-service
  script:
    - python3 service_generator.py {name}
  artifacts:
    paths:
      - service_{name}_pipeline.yml
  when: manual

trigger-{name}-service:
  stage: trigger-service
  needs:
    - generate-{name}-service
  trigger:
    include:
      - artifact: service_{name}_pipeline.yml
        job: generate-{name}-service
"""


def main(names):
    with open("services.yml", "w") as f_out:
        f_out.write(generate_header())
        for name in names:
            f_out.write(generate_service_pipeline(name))


if __name__ == "__main__":
    names = sys.argv[1].split(",")
    main(names)
Finally, we need to define service_generator.py:
# service_generator.py
import sys

def generate_header():
    return f"""
stages:
  - build
  - test
  - deploy
"""

def generate_job(name):
    return f"""
build-{name}:
  stage: build
  script:
    - echo "Building service {name}"

test-{name}:
  stage: test
  needs:
    - build-{name}
  script:
    - echo "Testing service {name}"

deploy-{name}:
  stage: deploy
  needs:
    - build-{name}
    - test-{name}
  script:
    - echo "Deploying service {name}"
  when: manual
"""


def main(name):
    with open(f"service_{name}_pipeline.yml", "w") as f_out:
      f_out.write(generate_header())
      f_out.write(generate_job(name))


if __name__ == "__main__":
    name = sys.argv[1]
    main(name)
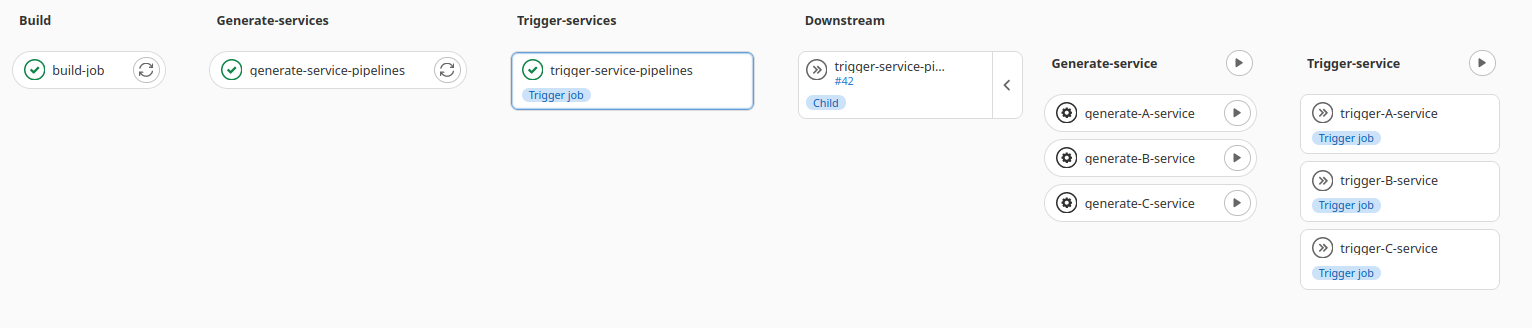
The first part of the pipeline looks like this:
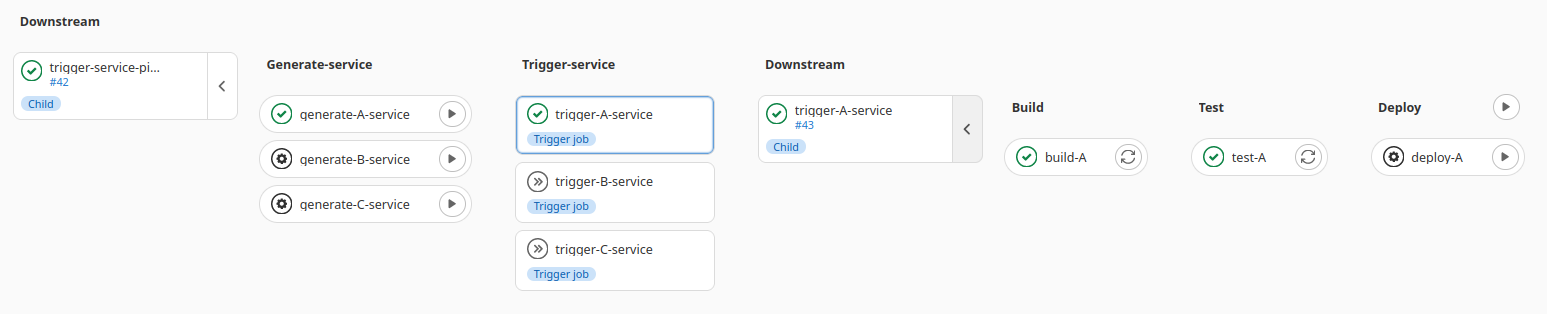
Based on the argument A,B,C we now have three child pipelines that generate
dedicated pipelines. Once activated, the rest of the setup looks like this:
Final Words
The focus of this article was to show you how we can use automation and parent-child pipelines in order to:
- Increase efficiency
- Reduce complexity
- Optimize performance
- Improve readability and future development
We’ve seen what parent-child pipelines represent, why they are important, and how to configure them both statically and dynamically. Additionally, I’ve added a section on how to configure GitLab locally and establish a playground so you can experiment on your own.
Provided code examples are just dummy examples whose purpose is to introduce the concepts and spark your interest. The exact implementation, of course, depends on the project and its use case.
I hope you enjoyed reading this article and, as always, feel free to reach out to me if you have any questions or suggestions.
Leave a comment